This recipe will explain how to make a bootable USB Drive or Flash Memory card. Your motherboard/computer will need to support such options and also note that this may not work with ALL usb drives or memory cards. We will be using PE Builder, HP’s USB Drive format tool, and Windows Server 2003 SP1 to do this. Lets get geeking.
First things first; we need to get our ingredients/applications.
–PE Builder
http://www.nu2.nu/download.php?sFile=pebuilder3110a.exe
–Windows Server 2003
http://www.microsoft.com/downloads/details.aspx?FamilyID=22cfc239-337c-4d81-8354-72593b1c1f43&DisplayLang=en
–HP USB Format utility
http://files.extremeoverclocking.com/file.php?f=197 (finding link on HP site is impossible).
1. Install PEBuilder. Make a note of where you install it since we will be hanging out there a lot.
2. Download the Windows Server 2003 SP1 update. We will not be running this update but extracting 2 files from it.
If you have Winzip installed, you can just right-click on the .exe file, and choose to Extract to Folder. Once you have the update files extracted, go to the i386 folder and copy the file: setupldr.bin to the pebuilder folder\srsp1 (you will need to create the srsp1 folder in the pe builder folder, usually C:\pebuilder3110a\ )
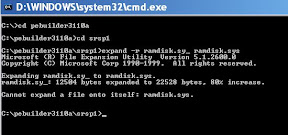
To get the second file, we will need to bust out some command prompt and the expand command.
First, lets make this easier and copy ramdisk.sy_ to the srsp1 folder we just created and has the setupldr.bin file in (ie c:\pebuilder3110a\srsp1\ramdisk.sy_
Open up command prompt and change directory to c: by typing: cd\
then type: cd pebuilder3110a
type: cd srsp1
and finally type: expand -r ramdisk.sy_ ramdisk.sys
this will expand the file to the srsp1 folder. you may get an error in the command prompt, you can ignore that since it still will expand the file.

You can now delete the windows server 2003 sp1 folder that we extracted the .exe to. we only needed the two files from the whole SP1
3. Download the HP USB Format utility. You will not need to install it since its just an executable file that runs.
4. Connect your USB Drive or insert your memory card, i’ll use my 1GB SD card (since i have a pc that has a USB Memory card reader and my pc can boot to USB devices).
5. Run the HP’s USB utility. Hopefully your device shows up in the drop down, mine shows up as Z: (along w/my other memory card reader types).

Change the File System to FAT and give it a label and click Start.

Do a yes to the warning and let it format. It shouldn’t take too long and will show a results screen when done.

Click OK and then click on Close to exit the utility.
This utility basically will format the usb drive or memory card and also make the partition active (which seems to be key to getting it bootable and to work w/PEBuilder).
6. Open up PE Builder. It may ask to search for windows installation files, for now choose No.
7. Next, we will need to setup PE Builder to find our Windows XP source files. The easiest thing to do is just insert your Windows XP Setup CD and copy the i386 folder to your harddrive. I have all of my OS copied to my harddrive for backup and to run installs from.
Once you have the i386 folder copied, in PE Bulider click on the … button under Source and browse to the folder where you copied the i386 folder.
Leave the Output as is: BartPE
Then under Media Output, also leave that at None.
Finally, you can now configure any plugins you may want to add such as Adaware, Ghost8, Nero Burn, etc. This is nice for making diagnostic/fix boot discs.

Once your done, just click the Build button. This will now create the iso file we will use to make the USB Driver or memory card bootable w/the BartPE os.

8. Finally, we will need to open up command prompt again.
Type: cd\ to get to the root of the c drive.
then change directory to the pebuilder folder, ie cd pebuilder3110a
finally, type: pe2usb z:
where z: is the drive letter of my usb drive or memory card.
let it finish and now try out your bootable usb drive / memory card. remember to set your bios to boot from usb-fdd if possible or usb-hdd (which ever your usb drive shows as).

Voila!
Again, this may or may not work with your usb drive/memory card depending on the card/drive and your motherboard and how it boots.
here is a link to the Help manual for PEBuilder at bart’s PE site
http://www.nu2.nu/pebuilder/help/
also forum board for discussions:
http://www.911cd.net/forums//index.php?showtopic=10806&st=1
For more info on creating a live bootable cd/dvd, check out the recipe here:
http://blogs.tech-recipes.com/seamonkey420/2007/02/17/making-life-easy-custom-live-boot-cds-for-ghosting-cleaning-pc/
–you can also format your usb drive using this command when you in the pebuilder folder:
c:\pebuilder3110a\pe2usb -f z:
the -f flag will tell the batch file to format the drive; this did not work for my Sandisk Cruzer USB Drive but the HP USB Utility did. I was able to boot it on a Dell C640 and X300 so far.
