Many of us have amassed extremely large music collections through various and sundry means. This heterogenous collection of files will have non-uniform volume, absent tags, and missing album art. Through the use of some free tools, conquering your music library is relatively easy.
Let’s be honest. The majority of us have gained music from a wide variety of sources–Napster, Kazaa, iTunes, capturing online music streams, ripping CDs, or even just searching google. Because these files have been obtained from such different sources, most music libraries are a complete mess. The three biggest issues that we will conquer here are unleveled volume, missing album art, and untagged files.
Leveling Your Volume
Editor’s note: Most of my audiophile friends would argue that users should not level volumes within the audio files themselves. Each adjustment and conversion takes away fidelity. Additionally, the volume is an essential part of the music that shouldn’t be ignored. Some audio needs to be quieter and some needs to be louder. Additionally, most audio devices and audio programs now have the option to level music automatically without actually editing the files. That being said, the varying levels of volume can really hurt audio enjoyment and many people want their file volumes very similar to each other.
We will be leveling volume with MediaMonkey. The free version will happily level your audio files without difficulty.
1. Install and run the application.
2. Go to the File menu and choose Add/Rescan Folders to Library.
3. Repeat until all music files are in the library.
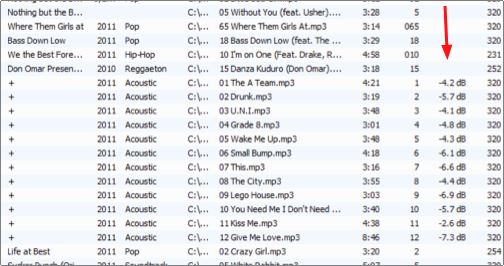
4. Many of the tracks will have annotations noting non-uniform volume such as -4.2 db or -1.2db.

5. Select these files and select Level Track Volume.

Collecting Album Art and Tags
Album art and tags can be obtained through mediamonkey as well. So if you did not install it for leveling your audio, you will need to install it and load your music files as previously described. As long as you have the correct artist name and album name listed, you will be able to fill in your missing album art without difficulty.
1. Click on Album to sort your tracks based on album name.
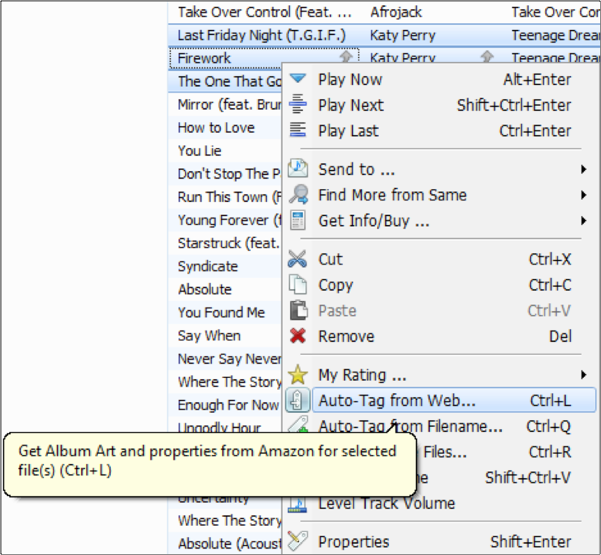
2. Select on all the songs from an Album, right-click, and select Auto-Tag from Web.

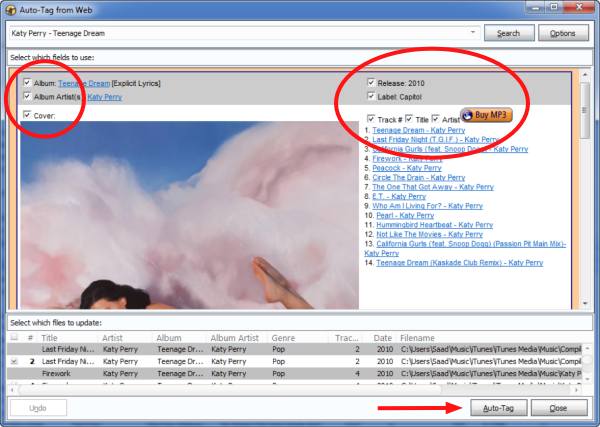
3. When the auto-tag window opens, tick the Cover checkbox to tag the music file with the cover art that is displayed.
4. Select which other information you would like to include as your metadata tags. Release date, label, track name, title, and other information should be included. Check the information you think is important and select the Auto-Tag button.
5. Rinse and repeat for each album and music file.

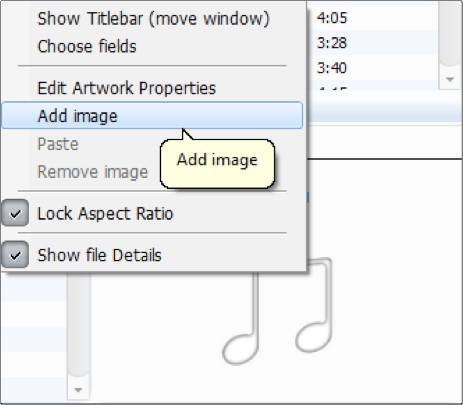
6. If you need to manually add the album art, just search and download the appropriate images from albumart.org. Select the audio file, right-click, and select Add image. Select the appropriate image file to tag the file with the correct album art.

