Even if every other method fails, a bootable CD image will allow you to clean almost any infected system.
As the viral world of computers and networking grows, so does the market of social engineering and virus development. Through the course of using the Internet and your computer, you will eventually come into contact with malware. A computer virus might corrupt or delete data on your computer, use your email program to spread itself to other computers, or even erase everything on your hard disk.
The need for this guide became apparent when the latest version of the FBI MonePack Virus hit systems all over the world. The newest version has figured out how to disable all three safe modes in Windows, thus rendering virus removal through other methods virtually impossible.
For this article you will need to download Hiren’s BootCD.
1. The first step is to download and extract the downloaded zip file. You can do this by right-clicking the file after download and choosing Extract All. I use WinRAR in lieu of Window’s built-in WinZip feature, and I recommend you do the same. WinRAR is not technically freeware, but the trial never expires. Donate if you can!


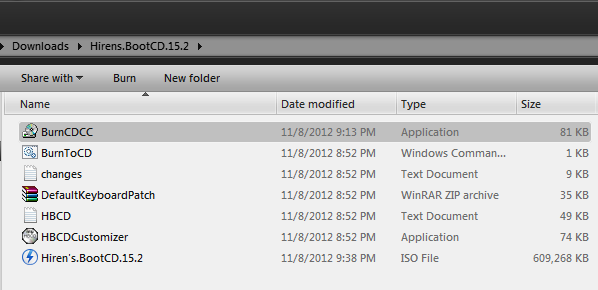
2. There are two files from the extracted files that we will use. The “BurnCDCC.exe” file and the “Hiren’s.BootCD.15.2.iso” file. Double-click BurnCDCC.exe to run the application.
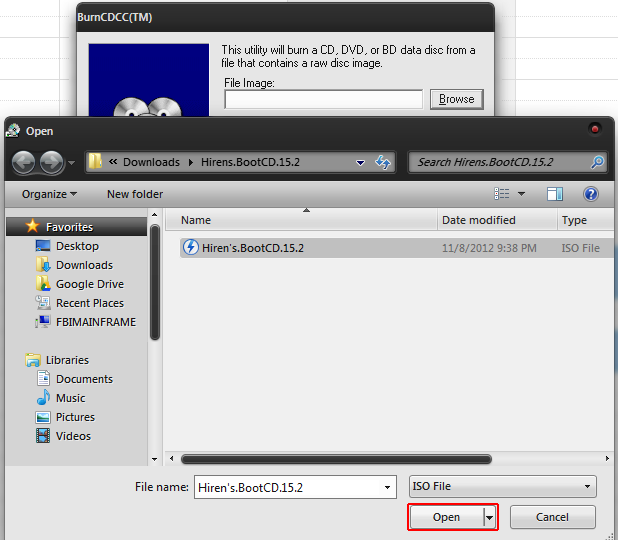
3. The CDCC program should run once you have double-clicked it. Click Browse in CDCC, and browse to and select the “Hiren’s.BootCD.15.2.iso” file that was extracted. Then click Open.

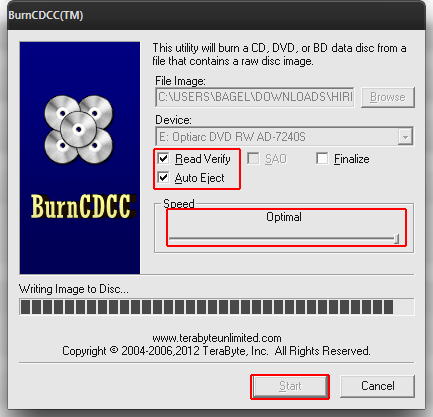
4. Since Hiren’s is only ~610MB, then you can either use a blank CD or a blank DVD. Insert the blank disk into your machine. In BurnCDCC under Device, your disk drive should be labeled. If you have multiple disk drives in your machine, then I am going to assume you know which drive you use for burning. Ensure the correct drive is selected. (If you only have one disk drive, then it should be selected by default.) I recommend checking the “Read Verify” box to ensure your write is successful, and leave the Speed bar at Optimal. (This is the bar dragged all the way to the right.) Once these checks have been made, click Start. If BurnCDCC ejects your disk and prompts to insert a blank one, simply push your disk back in the drive and select OK from the pop-up.
5. Now comes the fun (and potentially) confusing part. This step involves booting your computer from the disk you have just created instead of booting to the hard drive. This process can be fairly straight-forward, but for many it will not be. When you first boot your computer when it is completely shutdown (not in hibernate or sleep mode), you will most likely see a BIOS screen with a “Gigabyte” or “MSI” logo. (This could be many different screens, depending on your motherboard.) Either above or below this logo, you should see text similar to the following: “F12 for Setup,” “F10 for Boot Menu,” etc. What you are looking for is Boot Menu, Boot Order, Boot Screen, or the like. Common keys for this task are F2, F8, F10, F12 or Delete (Del).
If your computer displays what key to use for Boot Menu, then begin tapping it repeatedly the instant you press the power button on your computer. Continue to tap it until you are presented with a Boot Menu which lists your Hard Drive, Disk Drive, and potentially your Flash Media or Floppy. If your computer does not say, then try the tapping process, using each of the common keys provided above. One of them should get you to the right place. If, by chance, you still cannot get into boot menu, then you will have to change your Boot Order or Boot Priority in your BIOS. BIOS will be one of the F-Keys listed above as well (normally a blue screen with white writing, though newer motherboards are moving to a 3D experience). Refer to your specific computer model’s manual on the manufacturers website if you have tried all of these but still cannot access the Boot Menu. You may even need to refer to the manual for your specific motherboard, which should be listed in the manufacturer’s manual.
Once you have managed to get to your boot menu, select your Disk Drive, and press Enter. Your computer should now begin booting to Hiren’s BootCD.
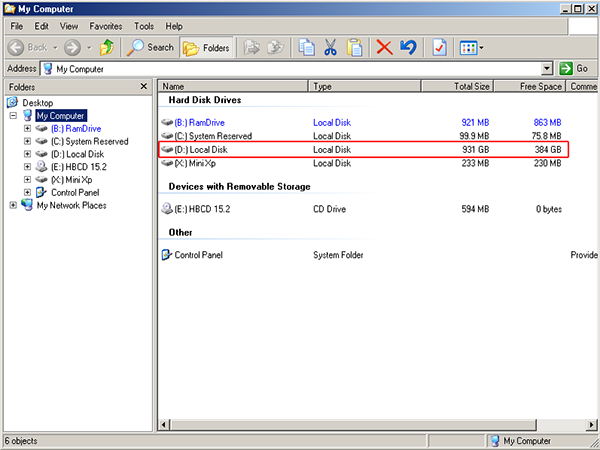
6. Once Hiren’s BootCD loads, use the arrow keys on your keyboard to select the Mini XP option, and hit Enter. This will boot you into a weird distro of Windows XP. Once you have loaded Mini XP, you need to check to see what label your Local Disk has been given by the BootCD’s file hierarchy. Click Start, Programs, then Windows Explorer. When the Explorer window opens, it should default to My Computer. Here, it will list all the drives on your machine and a virtual drive created to run Mini XP. (My virtual drive was called the X:\ drive, and my Local Disk drive was called the D:\ drive.) Ensure you know which drive is your Local Disk (e.g., C:\, D:\, E:\, etc). You will need this for the virus removal stage.

![]() 7. The next step is to load the HBCD Menu Program Launcher. This menu contains 100+ tools that could be used for various scenarios. Click the HBCD icon on the Mini XP desktop. When Hiren’s BootCD 15.7 – Program Launcher opens, click the Programs menu in the top left, hover over AntiVirus/Spyware and select MalwareBytes’ Anti-Malware from the pop-out menu.
7. The next step is to load the HBCD Menu Program Launcher. This menu contains 100+ tools that could be used for various scenarios. Click the HBCD icon on the Mini XP desktop. When Hiren’s BootCD 15.7 – Program Launcher opens, click the Programs menu in the top left, hover over AntiVirus/Spyware and select MalwareBytes’ Anti-Malware from the pop-out menu.
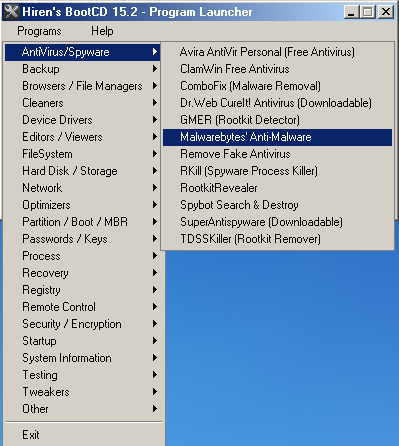
8. You will be prompted with a CMD window telling you that it is better to run MBAM from your Operating System installed on your hard drive, but many viruses prevent that from happening. Disregard this error, and do as it says: Press Any Key on the keyboard. This will make the window go away, and Malwarebytes’ Anti-Malware (MBAM) will load.

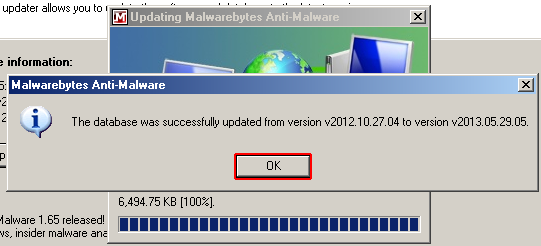
9. Now, we need to update the virus definition database of MBAM. To do this, click the Update tab and then the Check for Updates button. When the updates have been downloaded, click OK on the window that pops up.

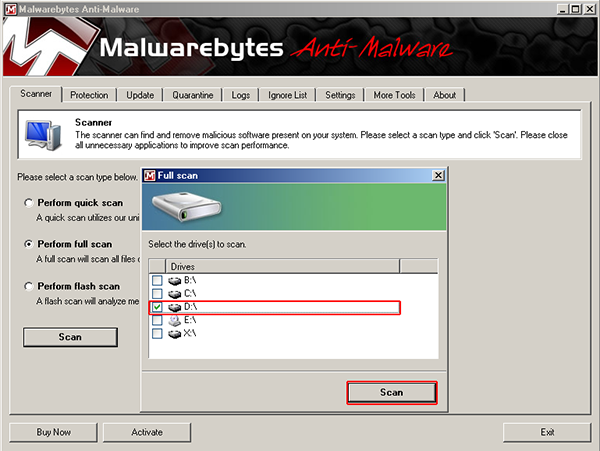
10. You are finally ready to begin the removal process! Click the Scanner tab at the top of MBAM. Ensure the Perform Full Scan radio is selected, and then click Scan. You will be prompted with a window that lets you select which drive to scan. This is where you select the drive you verified earlier by going to Windows Explorer and finding Local Disk. You can select other drives as well, but your Local Disk drive is the only one that really needs to be scanned. If you leave the virtual drive created for Mini XP (This is usually the X:\ drive.), then MBAM will find a few extra “infections” which are really utilities Mini XP uses. Removing them will not harm anything, since they cannot actually be removed from the CD.

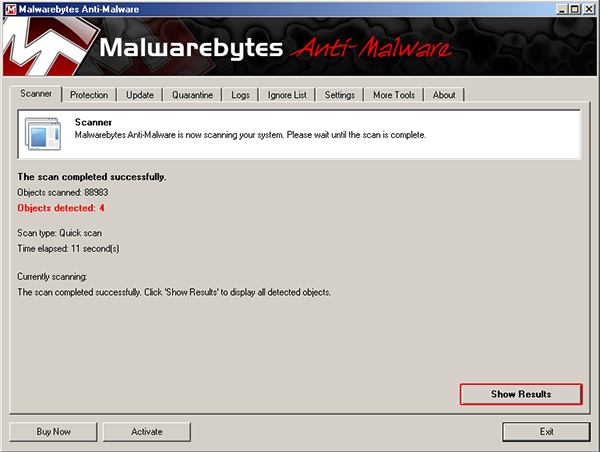
11. Once MBAM has finished scanning your hard drive, you will be presented with a screen with a button labeled Show Results. Click it! This will bring you to a new window where the infectious files will be listed. Ensure ALL infections have a check mark beside them. Once you have checked everything, click the Remove Selected button.
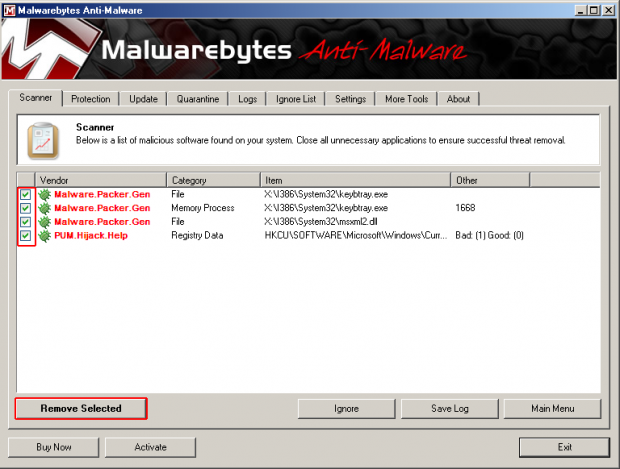
12. I know this has been a long and drawn-out process. However, viruses have become very advanced, and when they completely prevent you from working directly on your hard drive and regular operating system, this method starts to look pretty good, in lieu of wiping and reloading the machine. From here, you can go to Start and then Shut Down, and boot your computer regularly into your hard drive. There should not be a need to go back to the boot menu.
If you fell into the case where you had to modify your default boot priority by going into BIOS, repeat the steps you took to get into BIOS, and put your Hard Drive back as the first boot device. Removing Hiren’s BootCD from the drive should also alleviate the need to change the boot priority.
Your computer should now be virus-free and back to working conditions. Do note, however, that many viruses can cause irreversible damage to your operating system. Luckily, most are simply spam and malware that are attempting to sell you something and do not cause internal damage. If you have removed the virus but still find your computer functioning improperly, you may have been one of the unlucky ones and acquired a malicious virus whose purpose is to cause problems within the system. If this is the case, then backing up your data and reloading your operating system may be the final solution.


