We have always had workarounds to convert documents and web pages to PDFs, but Windows 10 has simplified the process and eliminated the need for third-party applications by building in Microsoft Print to PDF. Essentially, this new feature comes pre-installed as a virtual printer on your computer. Instead of printing on paper, the output of this “printing” will be a PDF document saved somewhere on your computer that you can store or share. This tutorial explains how to use Microsoft Print to PDF in Windows 10.
Arguably the best part of this feature is that it is available EVERYWHERE. You can choose Microsoft Print to PDF when you are working in Microsoft Office, browsing the web, or doing just about anything. Every program that allows you to print will have Microsoft Print to PDF listed in your printer choices. This is a great way to convert various file types into universally accepted PDFs.
1.Pull up whatever you want to print. Again, this can be a file, picture, or web page opened in any program that allows you to print. Go to file>print or press ctrl+P to open the printing options.
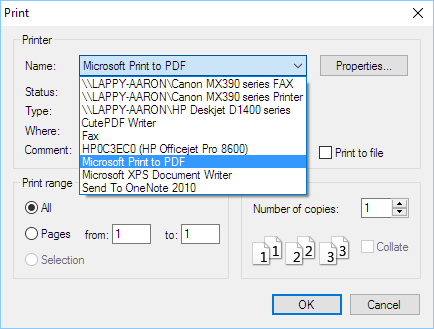
2.The print options windows may look different depending on which program you are using to print, but they should all have an option for you to choose which printer to use. This option will be labeled with something such as “Printer name” or “Destination.” All printer drivers that you have installed on your computer will show up on this list, along with a few default options. Choose Microsoft Print to PDF from the list, and then click OK. 
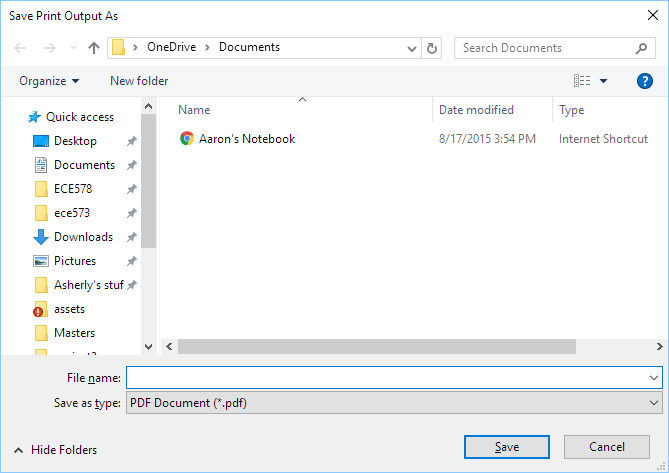
3.A file explorer window will open for you to choose the destination of your new PDF. Name the file, and choose the folder where you want to save it, just like you would with any other file. 
What will be included in the PDF?
The PDF you create will contain everything that would show up if you printed it on physical paper. Links or bookmarks will not work in the PDF.

