In recent years internet security is becoming a very attractive discussion topic. the most popular way of adding an extra security is by using a Virtual Private Network or VPN for short. The VPN adds an extra layer of security making it impossible to have your packets and data intercepted by a third party. In theory at least. In real life situations, it is not the most secure way, but it get’s the job done. What the VPN does is that it creates a tunnel where you packets are passing through so that is the protection that most people are looking for.
Windows 10 comes preinstalled with a VPN feature where you can create the security tunnel without using a third party application for it. The only thing that you need to bear in mind is that if you intend on using the built-in VPN client on Windows 10 you will need to set a specific server to use, unlike some third-party VPN applications where you are able to bounce between servers.
1.Click on the start button on the left of the taskbar or press the Windows key on your keyboard
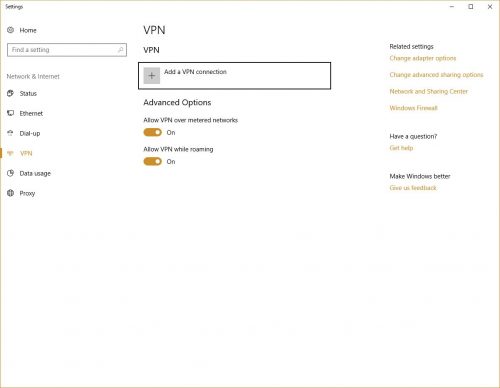
2.Type in “VPN” and click on the result titled “Change Virtual Private Networks”
3.Click on “Add a VPN Connection”

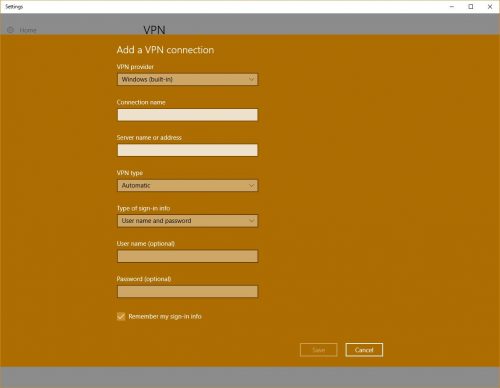
4.Under VPN provider select “Windows (built-in). Next give your VPN connection a name and enter in the VPN server name or address. The settings below will depend on the type of VPN server that you are using. If you are not exactly sure the VPN type or the type of sign-in info contact your provider for further details. The username and password are optional, again, depending on the type of VPN so you will need to contact your provider on this matter as well, if you are not sure about it.

5.Once you enter all the required information, click “Save”
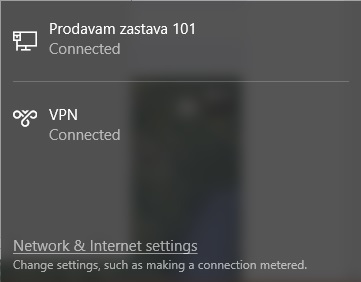
6.Once you have set everything up, you will need to click on your network icon on right side of the taskbar (WiFi or LAN icon) and click on the VPN that you just created. Depending on the server, you might need to enter a username and password.

Creating and connecting to a VPN doesn’t always mean a secure connection. In order to make sure that you have set everything up as you should, you must check if your public IP address is changed. Before connecting the VPN (you can disconnect if you are already connected) navigate to a website that can provide you with your public IP address. There are tons of websites like these that you can find online, for this article we used ipleak.net. Write down the address and then connect your VPN and refresh the website. If the address before connecting to the VPN is different than the one you are getting after connecting, that means that you have set everything up as you should and you can continue surfing securely.
Frequently Asked Questions and Answers
Q: When I tried to connect to my VPN, but it says that the username and password are incorrect.
A: Double check if you are typing in the login credentials correctly. If the problem persists, contact your provider either to issue you new username and password or to troubleshoot why you can’t connect to the VPN.
Q: How can I setup a VPN using a certificate?
A: if you are using a IKEv2 type of connection first you will need to download the certificate and open it. A warning pop up will open where you will need to click on “Open”. On the next window click on “Install certificate”. In the certificate import wizard window select “Local Machine” and click on “Next”. In the Certificate Store section select “Place all certificate in the following store” and click on “Browse”. In the new window locate and click on “Trusted Root Certification Authorities” and click “OK”. The window will close and then you will need to click on “OK”, then “Finish” then “OK” again. Now you have the certificate set up, so all you will need to do if go through the above steps, where under VPN type you will need to select IKEv2 and continue with the process.
Q: The IP address before and after connecting is the same
A: Contact your provider to see what might be problem, or if you are using free VPN servers try connecting to another one.

