Since the earliest version of Windows, the default user folder were always stored where the operation system is or to be a bit more specific in C:/Users. Whenever you create a new user, or just use the one that comes with your Windows you will see a new folder with the user’s name.
In general this is a policy that works well in situations where the Windows doesn’t have to look for the files in those folder on another partition or disk. The problem with this can arise in situations where you decided to upgrade your HDD to an SSD. Since the SSD is more expensive you probably got one with a smaller capacity. This would mean that you would be looking at getting the most out of the storage that you have. The same issue can be seen if you have a tablet with a Windows operating system. Since most of the tablets come with a small built in storage you often come across a notification that you are low on storage.
Several weeks ago, we spoke about how to free up space on your Windows 10 machine. This includes doing a disk cleanup, remove files that you don’t need, disable hibernation or even reducing the footprint of the operating system.
This procedure will definitely free up space on your system partition or drive, but that space that you will free up will need to be moved somewhere else. It is recommended that “somewhere else” to be on a different partition or disk and not on a USB drive or an external disk and definitely not on a different computer connected to the same network. The reason for this is that Windows will start misbehaving due to the fact that these kind of locations can be disconnected.
1.Open up File Explorer
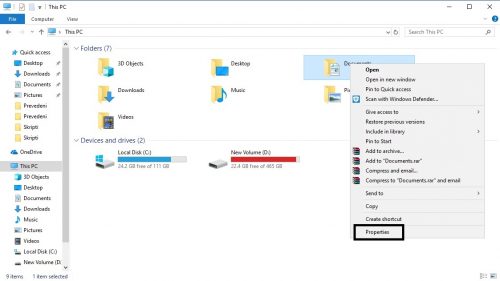
2.From the left navigation menu, navigate to “This PC’
3.On the top you will see all of your folders that are normally in your user folder. These include Documents, Downloads, Videos, Pictures, Music and Desktop. You may see a few other folders that can be associated with a certain application
4.Right click on a folder that you want to move and select “Properties” on the bottom

5.Navigate to the “Location” tab on the top

6.As you can see, you have the path to the folder that you are trying to move. In this case, the Documents folder is stored on C:\Users\Andov\Documents. Right bellow the address location there are 3 buttons. Click on the middle one that says “Move”

7.A new window will open where you will need to browse the new location of your user folder. When you’re done, click on “Select Folder”
8.When that window closes, click on “Apply”
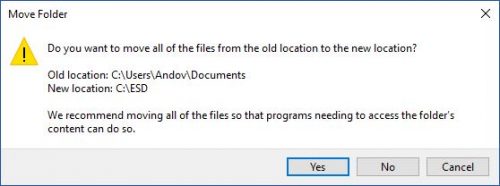
9.Windows will ask you if you are sure that you want to move your folder to a new location and will also provide you with the location for the current user folders as well as the one that you have selected. Click on “Yes” to continue with the process. Depending on the size of the files that you have the process of moving the files may take some time

If you want to move more than one user folder, you will need to repeat the steps for each one separately. Also, if you move your user folders from your SSD to your HDD be aware the read and write speed will be lower, so accessing the files can be a bit slower than before, when you had them on your SSD.
Frequently Asked Questions and Answers
Q: Can I use this technique on other version of Windows?
A: Yes, the procedure is the same on Windows 7, 8 and 8.1.
Q: I moved my user folders and now I want to get them back to where they were previously.
A: when you open up the Properties window and navigate to the Location tab, on the left from the “move” button there is a “Restore Default” button which will move the folder back to its original location.
Q: I moved the downloads folder to another partition, but files are still downloaded in the default one.
A: The reason for this is that when you move a user folder to a different location on the operating system “knows” about that, while the applications don’t, so they continue to download in the default folder location. In order to avoid this, you need to change the download location in the application that you are using.

