Is your Google Chrome browser becoming laggy? Well, that might be an indication that you need to do away with some extensions. This article is dedicated to showing you basic steps to delete extensions on Google Chrome. The steps to achieve this are actually very simple to follow.
A browser extension is a plugin that enhances or extends the functionality of a web browser. As a dedicated user of Google Chrome browser, you would probably have more than a few plugins installed to aid you to perform some tasks. But you’d agree with me that most times our browsers get too clustered with too many extensions and then we have no other option but to delete them. Now, this brings us to the primary mission of this post ”teaching you how to delete extensions on Google chrome”
The ability of any operating system to undo changes properly is what makes it stand out. Imagine you installed a theme on your Google Chrome browser and it says you can’t change it unless you reinstall Chrome, and if you sign in again, it gets automatically reinstalled, that would literally be hell.
Well, Google Chrome isn’t so bad, it has options to help you reverse changes you don’t want anymore. It might be a little bit hard for some people when it comes to disabling changes made to their browsers, that’s why I am putting up this tutorial to give you a one time guide on how to permanently delete extensions on Google Chrome.
Sometimes, activated/installed extensions turn out to be a thorn in the flesh. They just mess things up, show pop-ups or even make some negative changes without your consent. Well, most Google Chrome extensions are safe and virus free but they are malicious ones that know how to do nothing but give you a bad experience each time you want to browse.
If there’s an extension you have installed that is messing up, no longer useful or you just want to use another alternative, you need to permanently remove/delete it.
To permanently delete extensions on Google Chrome, follow the steps outlined below.
Steps to Delete extensions on Google Chrome
1. Open your Google Chrome browser
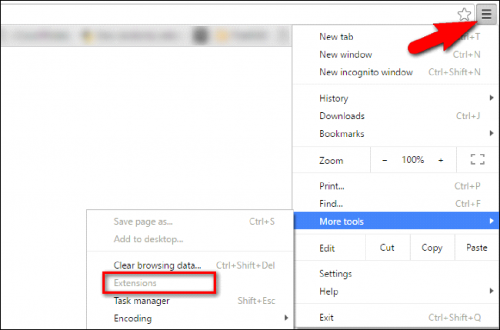
2. Click on the 3 menu icons at the top right which is tagged Customize and control Google Chrome.

3. Click on More Tools.
4. Now, select Extensions from the list that drops down.

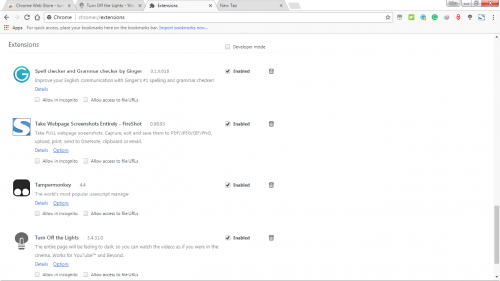
5. A list of all the extensions that you have installed on Google Chrome will be displayed.

6. Choose the extension you wish to completely remove.
7. Click the recycle bin-like or trash icon at the right of the extension you wish to remove permanently.

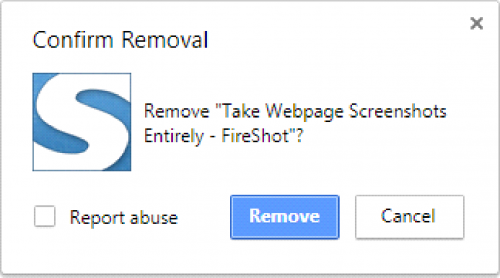
8. You will now be asked if you really want to remove the extension.

Click on Remove to permanently remove the extension. The extension will now be removed successfully from your Chrome browser. You can repeat the steps to permanently remove extensions on Chrome browser easily.
And there you have it, it is as simple as ABC.
Removing plugins from Google Chrome browser is simple and straightforward. It’s recommended that you always save/backup your data in case something goes wrong due to the removal of a plugin.
I Hope you find this guide useful. If there’s anything you would like to know or maybe you have experienced an error of some sort related to the processes in this article, you can always leave a feedback via the comments box and we will be of help to you.
Frequently Asked Questions And Answers
Q: Will removing plugins affect my chrome browser negatively?
A: Oh no, it won’t. It won’t touch your history, bookmarks, saved pages or downloads. You will only lose the plugins core functions. E.g, removing a plugin like Grammarly which corrects your typography will eventually make you type without suggestions or corrections.
Q: Do I need to restart my PC/Browser after removing plugins?
A: Well, you don’t actually need that, unless it is required by the plugin and if it is, you will be notified.
Q: What if I just want to disable a plugin for a while?
A: If you don’t want to permanently remove the plugin from your Chrome browser but would like to disable it for a while and then re-enable it later, it’s very possible. All you have to do is to tick the Enabled box close to the trash icon and that’s all. The plugin will no longer function but is still installed. If you need it again, just tick the enabled box and it’s back to active mode.
Q: What if the removed plugin still adds itself after a while?
A: This is literally a threat of some sort and could actually mean that plugin is a virus or a kinda plugin with a malicious intent to spoil your user experience. If that happens, you will need a paid Antivirus program like Avast, Avira to scan and remove trojans/malicious files. You can also manually check for any folder related to the plugin inside your Google Chrome browser and delete all it’s contents. Also, make sure your PC software is up to date and keep your antivirus definitions updated.

