Do you want to trim your awkward laugh out of the beginning or end of an otherwise great video or pull out short highlights from a filmed sporting event? The Windows 10 built-in Photos app has a video clip trimming tool Though it is not the best video editing software but good for basic editing. that is easy to use and is perfect for this basic editing.
Note that Trim is the only video editing tool available in the Photos app, which is mostly geared towards photo management and editing. You will have to import your clips to another program if you want to do more editing with your video clips.
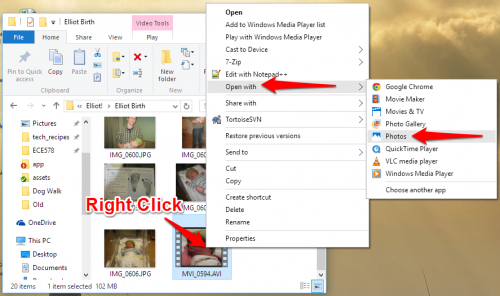
1.Open the video you want to edit with Photos. Navigate to the video you want to edit in File Explorer. Right-click on the video, and go to Open with>Photos. Alternatively, open the Photos app from the Start menu, and scroll through your collection or albums to find your video. I usually prefer the first method because Photos does not organize your pictures into folders, which means you have to scroll through your collection or find it in the albums that Photos generates. Additionally, you can filter and view movie file types in file explorer but not in Photos.
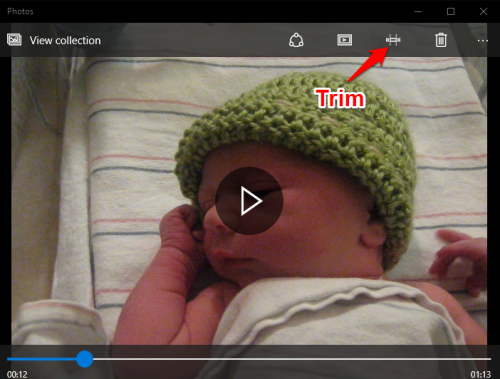
2.Click on the video to get the menu bar to appear across the top of the window as shown below. Click the Trim icon next to the trash can.
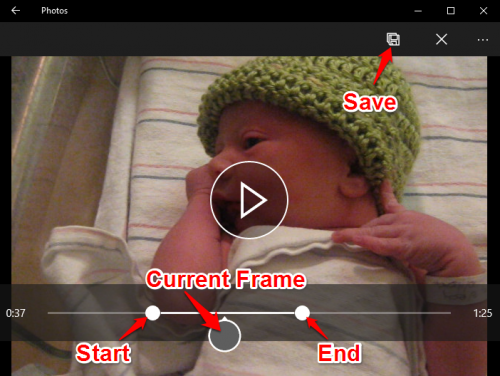
3.There are three circles on the timeline that run across the bottom portion of the screen. The two small white circles are the start and end markers of the clip. Drag them around to section off your trimmed clip. Whenever you move one of these end markers, text showing the total selected length of the clip will appear above the marker. The bigger marker shows your current spot in the video clip. You can drag it around to make sure that all the important parts of your clip are included.

4.When you are ready to save, click the floppy disk icon in the top menu. This will save your clip as a copy, leaving the original video untrimmed.


