Bringing a laptop with you is pointless if the battery will not last the whole workday and if you do not have a place to charge it. Even when you are plugged into your charger, using more power translates into higher electric bills. Here are some settings you can tweak in Windows 10 to make your battery last longer and use less power.
1. Go to Settings>System.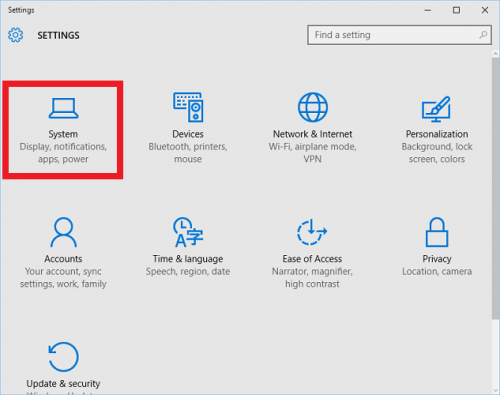
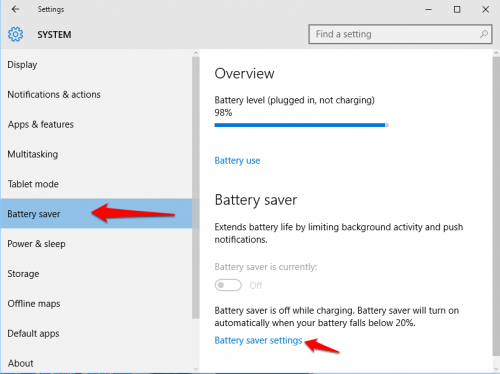
2. Select Battery Saver from the left panel. Battery saver is a mode that does exactly what its name implies. It makes your battery last longer by reducing your screen brightness and limiting which apps run in the background. This is great in many situations, but it comes with a performance cost. For this reason, you cannot turn on battery saver while your device is plugged into a power source.
By default, battery saver will turn on when your battery level drops to 20%. You may want to increase this if you frequently find yourself running out of battery power. Click on Battery saver settings at the bottom of the window.
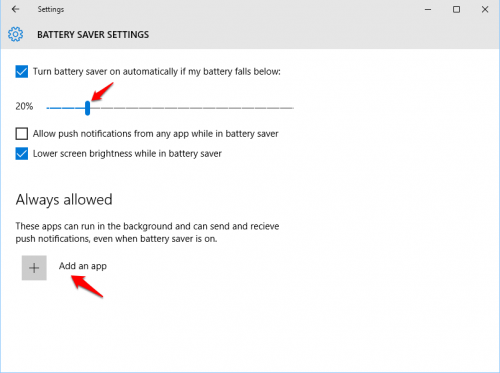
3. Drag the blue slider to set the battery saver level. This screen also allows you to control which apps can run in the background and send/receive notifications while battery saver is off. By default, all non-essential background activity is turned off when battery saver is on. You need to specifically tell Windows if you want certain apps to continue running and draining some battery power. For example, if you have important alarms that you want to go off while you are in battery saver mode, click the Add an app option beneath the Always allowed section, and choose Alarms & Clock from the list that will appear.
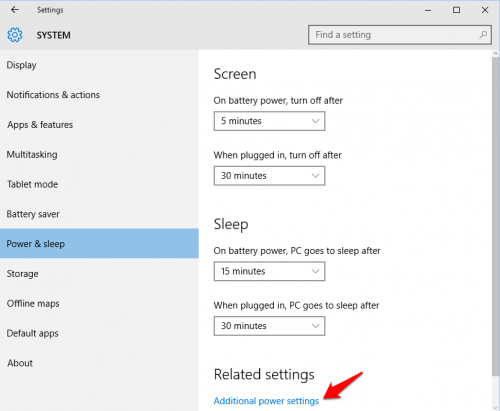
4. Go back to System Settings, and select Power & sleep from the left panel. Let’s go over some basic terminology.
Turn off display: All your applications are still actively running, but the screen is turned off. This saves you a bit of energy usage, and you will be back where you left off instantly when you turn the screen back on.
Sleep: Your device is partially turned off. The screen goes blank, and your battery drains slowly. Your device will wake up quickly, and none of your applications will be closed. You should put your device to sleep during breaks throughout the day to save power.
Hibernate: Think of this like a more intense sleep. Your battery drains even slower, but it takes longer to start back up. None of your applications will be closed. Use this when you will not use your computer for an extended period of time but do not want to power off completely.
Shut Down: Your device is turned completely off. The battery will hardly drain at all. All your applications will be closed, and it will take a while to turn back on.
Your computer will sense when you are idle (not moving the mouse or typing). Then it will eventually turn off the screen and go to sleep. The Power & Sleep settings panel allows you to control how long your computer waits before doing this. Turning off the screen and/or putting your computer to sleep after shorter periods of time will increase your battery life, but it can be annoying if you are constantly having to turn it back on.
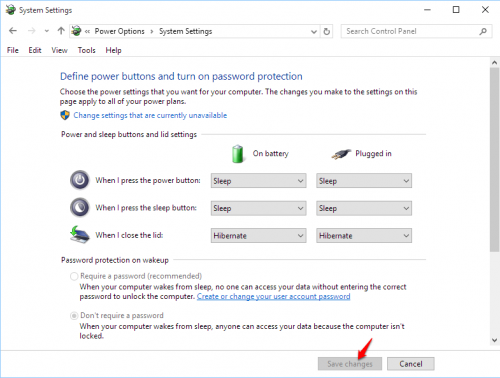
5. Click Additional power settings as shown in the picture above. This brings you to a panel with more power-saving options for you to customize. Click on Choose what the power buttons do or Choose what closing the lid does.
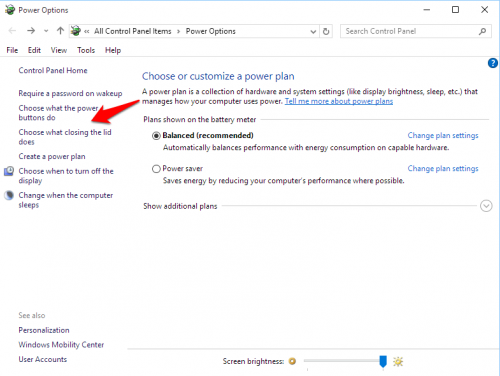
6. You can now choose if you want your computer to sleep, hibernate, shut down, or turn off the display when you push the power and sleep buttons or when you close your laptop lid. Set up how you want your computer to respond to these actions when it is running on battery power and when it is plugged into a charger.
