To help users manage their email messages more effectively, Google has introduced the tab feature in Gmail. However, this feature is not enabled by default. This tutorial provides a step-by-step guide to turn this feature on and describes how to use it to manage your mailbox.
1. Log in to your Gmail account.
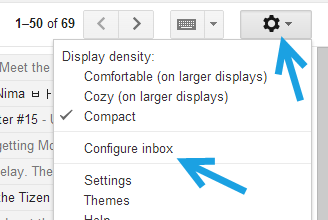
2. Once you are logged in, click the gear icon at the top left of the page to see the menu, and then choose Configure inbox.

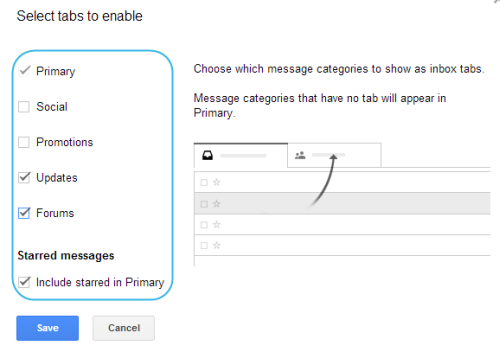
3. A new window will pop up on-screen that lets you choose the tabs that you want to display in your inbox. There are five tabs that you can enable:
– Primary contains the emails that matter to you most. Messages in this tab are mostly from your contact list or from contacts with whom you have talked.
– Social contains email messages from social networks like Facebook, Twitter, YouTube….
– Promotions contains marketing and deals messages.
– Updates contains bills, receipts, and confirmation messages.
– Forums contains emails from discussion boards and mailing lists.
The Include starred in Primary option at the bottom, if checked, will display starred messages in all the tabs in your Primary tab.
Please note that you can decide which tabs to display, but you cannot choose the name of the tabs. Messages that are supposed to be in the disabled tabs will be listed in the Primary inbox.
Tabs can be enabled or disabled at anytime. All you need to do is come back to the Configure inbox option, which can be found by clicking the gear icon.
Once you are done, click Save.

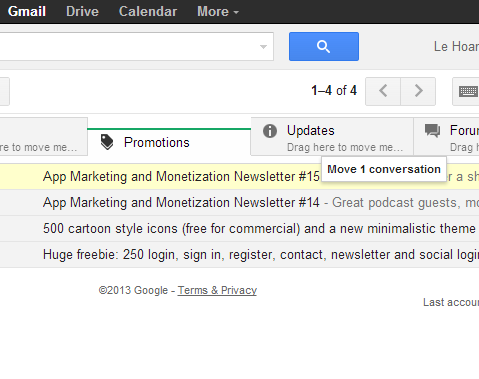
4. The enabled tabs will be displayed at the top of the inbox. You can circle between tabs by clicking on them.

5. Whenever you find an email message that does not belong to the current tab, click and drag it to another tab.

6. Whenever you move an email message to another tab, the service will ask if you want to keep future messages from that address in the new tab or not.


