Collages are a fun way to show multiple images at once. They can give viewers a feel for a whole event or theme without having to flip through multiple pictures. You can easily make a collage with Google Photos, which is my preferred service for backing up all my photos to the cloud. Check out my articles on other great features of Google Photos, such as creating movie montages, stories, and animations.
Your options are somewhat limited when you create a collage with Google Photos. You cannot change the order of the pictures in the collage any of the dimensions. That being said, Google Photos does produce aesthetically pleasing collages very quickly and easily. Use the steps in this tutorial to get started.
Like the other Google Photos creations, collages are only available on the Google Photos app. You can view your created collages at photos.google.com, but you will need to create them on your phone or tablet.
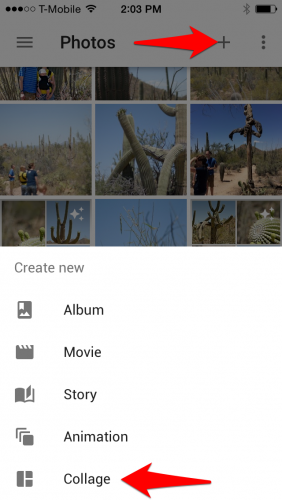
1.Launch the Google Photos app on your phone or tablet. Tap on the “+” on the top of the screen, and then select Collage from the list.

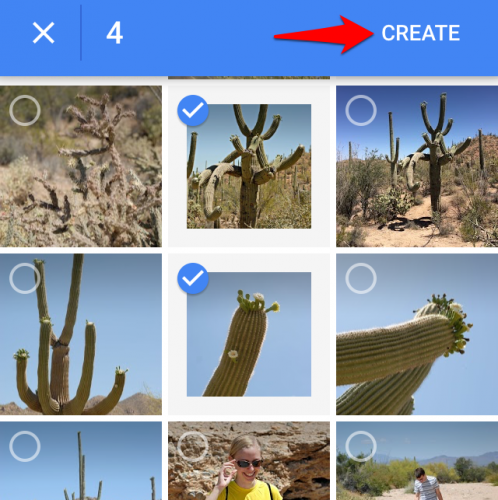
2.Choose up to nine photos to be included in your collage. To add multiple items at once, tap and hold your finger on the first photo until the check appears on it. Then drag your finger to include as many pictures as you want. You can tap a selected photo to remove it from your selection. Click Create when you have completed your selection of photos. 
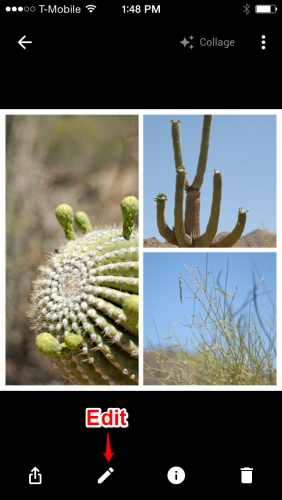
3.You are done. Your collage will open. Once collages are created, Google Photos treats them exactly the same as other photos. They will show up in your photos next to the photos that were used to create it.
4.You can edit the collage by applying filters, editing the color, light, and saturation of the collage as a whole, or by slapping on a vignette effect. These are the exact same editing options available to all other pictures. Note that you cannot edit individual frames of your collage, only the collage as a whole. Access these editing options by opening the collage in Google Photos and then clicking the pencil icon. 


