This recipe will explain how to use iTune’s Automatically Add to iTunes feature. This is an often overlooked and unknown feature in iTunes that lets you have iTunes automatically add music, movies, tv shows to your library. There are a few quirks but we’ll outline those too.
1. Install iTunes (this works with any version from 7.0 and up)
2. Navigate to your iTunes library location.
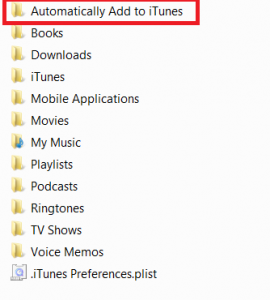
By default this will be in your My Music folder (if on Windows, ie C:\Documents and Settings\Userid\My Music or C:\Users\Userid\My Music) or Music (if on OS X). In here, you will see a folder, “Automatically Add to iTunes”.
Yup, you guessed it. Any media that iTunes can read/playback that is copied to this folder will get added to your iTunes library when you open up iTunes. It will copy the files to the appropriate iTunes folders (ie mp4 = Movies, m4a = Music, etc).
If you have an application that converts your movies or files to mp4 or m4v, you can have it output the files here and iTunes will import them for you. Perhaps you have torrented media files; you could also have your torrent application move your media files to this folder if you want to sync them to your iPhone/iPod/iPad.
Limitations:
–iTunes must be able to support the media file type for it to copy it (ie AVI or MKV won’t work)
iTunes Compatible File Formats: MP3, AIFF, WAV, MPEG-4, AAC/M4A, Apple Lossless
-With most video files, unless you modify the IDTAGS they will be defaulted to Movie as Media Kind.
-Files in the “Automatically Add to iTunes” are removed and moved to the appropriate iTunes folder.
-Opening iTunes seems to be the only way to trigger the import; it does not run in the background (or from what I’ve seen on Win7)
-Sync your Recently Added playlist to your iPhone/iPad/iPod to automatically have the added media synced to your device

