At some point in our lives, we all experience the moment of utter disbelief when our computer fails to boot. Many have felt the despair of not being able to open an important work project, or simply not finding it before the lights finally go out on our PC. That is usually due to some sort of hard drive failure, and moments later we realize the inevitable loss of innumerable hours as your PC served as the main storage of irreplaceable photos.
All of which have been carefully cataloged over the course of your entire life or your list of favorite online entertainment sources, as seen at nostrabet.com, a specialist in sportsbook entertainment information.
Similar to the talk about the birds and the bees you parents gave you at a time they considered you to be of the right age, one of the facts of life is, hard drives fail. If you failed to back-up your essential files, you will certainly remember the moment as one of the more catastrophic events in your life!
However, in such instances all may not be just quite lost yet, you may still recover all or some of your potentially lost data without necessarily having to incur the decidedly steep cost of reverting to the services of a professional data recovery specialist.
So, you don’t quite have to give up on that dead drive and start wailing in despair yet.
Why Drives Nosedive
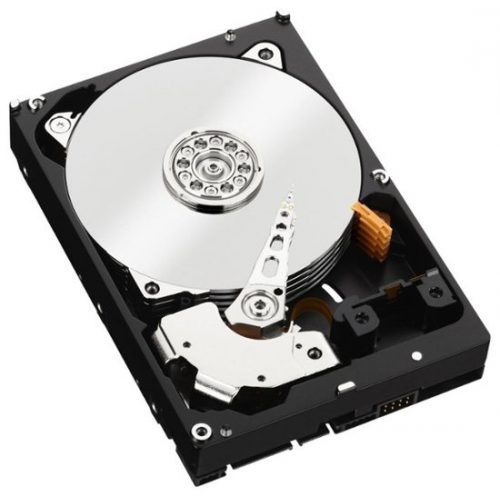
Hard drives or HDDs are mechanical devices comprising of numerous moving parts in addition to its various electronic components such as the magnetic platters that serve to store the data itself. A spindle motor drives the spinning platters, read/write arms move across the spinning platters by an actuator and read/write heads, positioned impossibly close to the platter surfaces, lay down or retrieve data. In fact, the R/W heads live so close to the platter surfaces, a single speck of dust can ruin the entire operation.
Early Warnings
Often, they fail with no warning at all, one minute all is fine, and data sings along merrily to serve at your command and the next moment the dreaded “blue screen of death” glares at you. This serves to warn you that despite your learning about each, and constantly remaining on the lookout hoping to see the early warning signs in time, sometimes there just aren’t any, so don’t rely on them. Since hope is a bad strategy, preparedness is always a better strategy.
Early warning signs comprise of just two categories, performance issues, and audible sounds.
If the HDD emits louder than usual clicks and clunks it’s a potential R/W arm that may be slamming to and fro, screeches and grinding may indicate a failing spindle bearing.
Noticeable performance issues include a distinctly noticeable frequency in the number of sudden freezes or crashes, the sudden cold, syrupy slow moving or copying of files are a clear indicator of a potential problem or HDD failure.

How To Retrieve Data From Damaged Hard Drives
1. Troubleshooting Dead Drives
If you have a Windows PC, reboot, and enter the auto HDD detect utility in the BIOS, run it if it fails to detect a drive. However, first, check the cable connections between the motherboard and the HDD. If it then shows up, use another PC to download and run the diagnostics for your specific HDD model. You will most probably find this on the manufacturer’s website, burn a bootable CD/DVD/Flash Drive, then boot your dead PC using the booting CD/DVD/Flash drive. These tests may provide you with an indication of what the problem is but may not be able to resolve it.
If you still come up with a dud as to what to the problem may be, create a CD/DVD/Flash Drive containing bootable virus scanner and scan your dead drive for any potential viruses that may be at the root of the problem. If following these processes produced any positive results you may at this time have a rough diagnosis and idea of the cause of your dead HDD without necessarily knowing exactly what is wrong.
Next, shut your secondary working PC down and connect your dead HDD to it as a secondary drive and listen closely for any of the abovementioned noises as the computer boots. If the HDD is completely silent and you feel no vibration if you touch it lightly, then the platters are failing to spin-up indicate a serious mechanical issue. If it vibrates slightly and does not protest its illness via an audible cacophony, it means the platters have spun-up, and your HDD problems are probably not mechanical in nature.
2. Attempting Temporary Repairs
Mechanical repairs by a professional may run into hundreds or even thousands of dollars but may deliver a high probability of resulting in a complete recovery of your data. The principal reason for the high cost attached to professional repairs is most HDD repairs require a “Clean Room” environment wherein they must complete the repair work.
Attempting DIY repairs will prove a highly challenging proposition indeed, you may be able to replace the parts yourself if you have a reasonably advanced technical skill set and the exact version and model of your drive to source the exact parts you require.
Replacing dead circuit boards represent a fairly straight forward challenge but replacing spindle bearings, motors, or actuators come at a whole new level of higher difficulty, requiring specialized tools, experience, and skill in employing these tools where even a slight touch can ruin a platter completely.
3. Extreme or Last-Ditch HDD Repairs
These methods come with no guarantee that any of them may work and might even cause further damage.
Sometimes the platters may just become stuck, to free them up first try freezing your dead HDD by encasing it in a watertight Ziplock bag and leaving the HDD in the freezer somewhere from two, up to 24 hours. Cold temperatures may shrink and free the binding items that jam the drive and preventing it from spinning up.
Before you start with this next venture, ensure you are fully prepared to engage in an immediate transfer of your dead hard drive’s complete data storage. Keep everything connected to your working PC having it already booted up with sufficient storage space for your recovered data.
Now try the impact method, start-off by lightly tapping the side of the drive casing with a small mallet or screwdriver handle. If you have no luck with that, drop the drive onto a flat hard surface from a height of about 15.2 centimeters or six inches making sure the drive falls flat on its metal chassis and not on a corner and escalate the impacts with successive higher drops.


