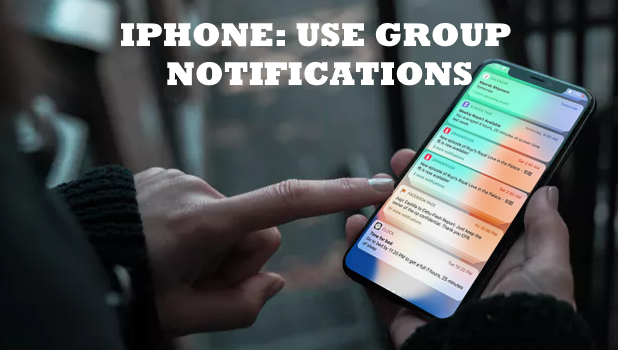
Notifications are double-edged swords. They alert you of important messages to keep you on top of things, yet too much of them can be distractive and can make you less productive. Apple understands that their users need to be focused and productive, so they introduced a better Notifications feature.
You can now group iPhone notifications per app or sender. Let this article guide you.
With the rolling out of iOS 12, Apple made changes to help you easily have control over your notifications. One way of having better control of your notifications is to have them grouped into topics, sender, or app types. Now, you’ll never be bombarded with notifications again. Learn how to group iPhone notifications and see what matters with a quick glance.
How to Group iPhone Notifications
Grouping notifications make it easier for you to view your iPhone alerts. Now, you do not have to scroll over a long list of notifications to find the really important ones. The next methods will outline two methods of grouping iPhone notifications. A separate section will discuss how to turn off group notifications for an app.
How to Group iPhone Notifications Automatically
With automatic notification grouping, iPhone decides how notifications of apps are handled. Follow the next steps to enable automatic Notifications Grouping on your iPhone.
1. Go to your iPhone’s Home screen.
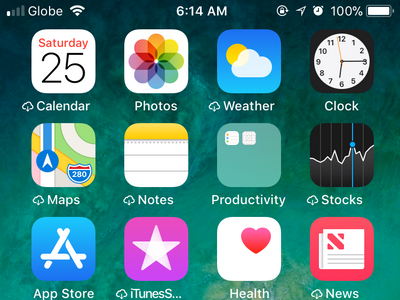
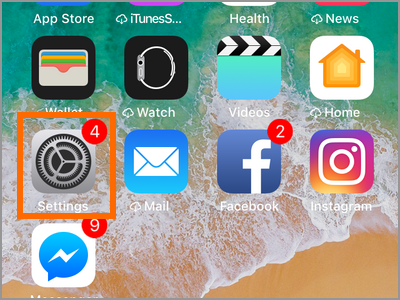
2. Then, open your device’s Settings app.
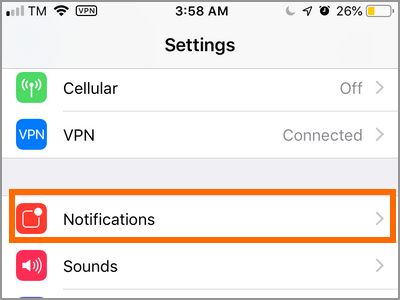
3. From Settings, tap on the Notifications settings.
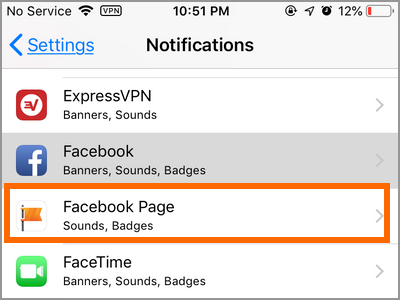
4. In the Notifications Settings, go to the Notification Style section and choose the app that you want to set to automatic grouping. Tap on the app to view available Notification options for the selected app. For tutorial purposes, let’s tap on the Facebook Page app.
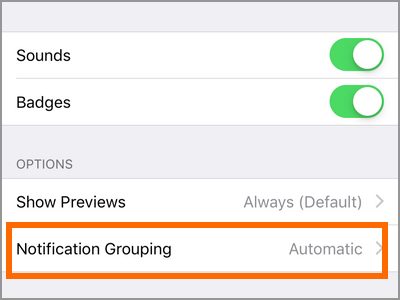
5. In the selected app’s Notification page, go to the Options section and tap on the Notification Grouping option.
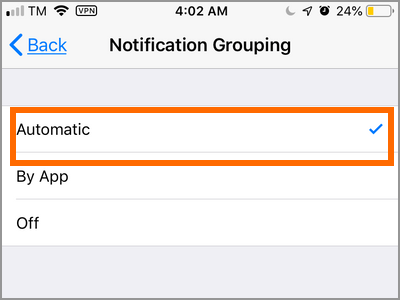
6. Tap on the Automatic option to set your notifications grouping for the selected app is automatic. A check mark is displayed in the rightmost part of the option to indicate that the option is selected.

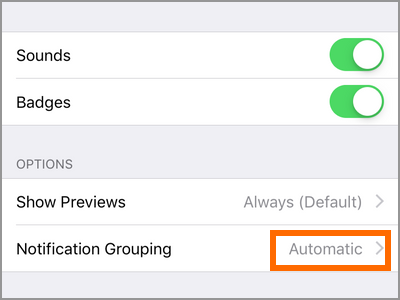
7. You can press the Back button to go back to the previous screen. The app’s Notifications Page will also show you that the app’s Notifications Grouping is set to Automatic. You are done.
How to Group iPhone Notifications By App
You can choose to have your iPhone’s notification grouped by app by following these steps:
1. Go to your iPhone’s Home screen. For iPhone 8 and older iPhone models, pressing the Home button takes you to the Home screen. For iPhone X models and similar variants (iPhone XS, iPhone XR, iPhone XS Max), you can go to the Home screen by swapping up from the bottom part of the screen to the middle part of it.

2. From your iPhone’s Home, open the Settings menu.

3. Next, open the Notifications option from your Settings.

4. From the Notifications Settings, scroll down to the Notifications style and tap on the app that you want to change the notification style.

5. From the App’s Notification page, tap on the Notification Grouping option.

6. After that, tap on the By App option to select the Notification Grouping type.
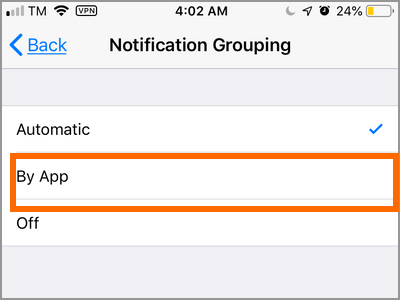
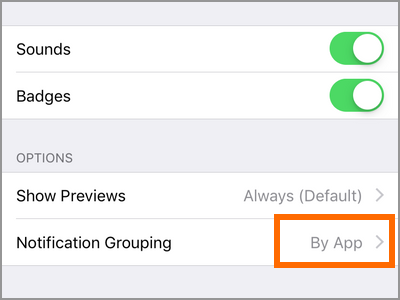
7. Finally, tap on the Back button to go back to the previous screen. Alternatively, you can go back to the Home screen. The settings are saved automatically.
How to Turn Off Group iPhone Notifications
You can choose to have your iPhone’s notification grouped by app by following these steps:
1. Go to your iPhone’s Home screen. For iPhone 8 and older iPhone models, pressing the Home button takes you to the Home screen. For iPhone X models and similar variants (iPhone XS, iPhone XR, iPhone XS Max), you can go to the Home screen by swapping up from the bottom part of the screen to the middle part of it.

2. From your iPhone’s Home, tap on the gear icon to open up the Settings menu.

3. Next, open the Notifications option from your iPhone’s Settings.

4. From the Notifications Settings, scroll down to the Notifications style and tap on the app that you want to change the notification style. For this tutorial’s purposes, tap on the Facebook Page app.

5. From the selected app’s Notification page, tap on the Notification Grouping option.

6. After that, tap on the OFF option to turn off Notifications Grouping.
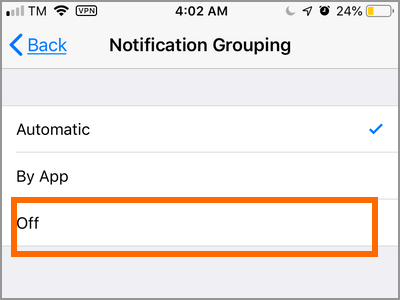
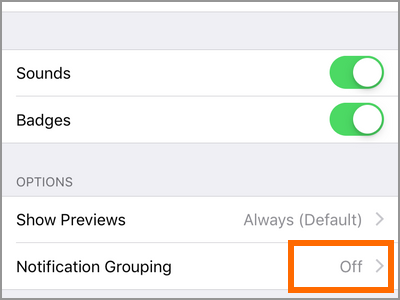
7. Finally, tap on the Back button to go back to the previous screen. The Notification Grouping should now show OFF.
Frequently Asked Questions
Q: Can I change Notification Groupings of apps at once? I find the process of manually going through each app and settings the Notification Grouping to be too time-consuming.
A: Unfortunately, Apple does not offer yet an option to apply the Notification Grouping feature to multiple apps at a time. Right now, you need to go to each app and select your preferred option.
You just learned how to group iPhone notifications automatically or by app. You also learned how to turn off Group Notifications on iPhone. If you have questions about any of the steps above, let us know in the comments section.
This article is part of our series in getting the most out of your notifications in iOS 12. You can check the article to see other tips to maximize your iPhone notifications-experience.

